
The garage – often the unsung hero of home storage, and just as often, a chaotic Bermuda Triangle where shovels disappear, rake teeth lie in wait, and finding the right pair of pruners feels like a quest of epic proportions. For gardeners, this space can quickly become a jumble of soil-caked tools, tangled hoses, and misplaced essentials. But imagine this: a garage where every garden tool has its designated spot, easily accessible, safely stored, and ready for action the moment the gardening bug bites.
Organizing your garden tools in the garage isn’t just about aesthetics; it’s about efficiency, tool longevity, safety, and reclaiming valuable space. A well-organized system saves you time searching, prevents damage to your tools (and your toes!), and makes starting your gardening tasks a joy, not a chore. This comprehensive guide will walk you through transforming your cluttered garage corner into a streamlined garden tool haven.
Why Bother Organizing Your Garden Tools? The Benefits Bloom
Before we dive into the how-to, let’s quickly reinforce the why. Understanding the benefits can be a powerful motivator to tackle this project:
- Save Time & Frustration: No more digging through piles or hunting in corners. Knowing exactly where everything is means less time searching and more time gardening.
- Extend Tool Lifespan: Tools stored properly – clean, dry, and protected – last significantly longer. Leaving metal tools exposed to moisture or buried under heavy objects leads to rust, damage, and premature replacement.
- Improve Safety: Sharp pruners, pointy trowels, and heavy shovels can be hazardous when left lying around. Proper storage minimizes the risk of accidental cuts, trips, or falling objects.
- Reclaim Valuable Space: Garages often serve multiple purposes. Getting tools off the floor and onto walls or into dedicated storage units frees up precious real estate for vehicles, other storage, or workspace.
- Know What You Have: An organized collection makes it easy to see which tools you own, preventing duplicate purchases and highlighting what you might be missing.
Convinced? Let’s get started on the transformation!
Step 1: The Great Garden Tool Gathering & Assessment
The first step to organization is knowing what you’re working with.
- Gather Everything: Pull all your garden tools out of the garage. Lay them out on the driveway or a cleared space. Don’t forget items tucked away in corners, behind boxes, or even those that migrated to the shed or basement.
- Assess and Declutter: Go through each tool.
- Keep: Tools you use regularly and are in good working condition.
- Repair: Tools that need a little TLC (sharpening, cleaning, tightening handles). Set these aside.
- Donate/Give Away: Tools you no longer use but are still functional. Someone else could benefit!
- Discard: Tools that are broken beyond repair, heavily rusted, or no longer serve a purpose. Dispose of these responsibly. Be mindful of disposing of chemicals or hazardous materials correctly according to local regulations.
This decluttering step is crucial. There’s no point organizing tools you don’t use or that are broken. Be ruthless but practical. Keep only what you need and use.
Step 2: Clean Your Keepers
Before putting tools away, give them a good cleaning.
- Remove soil and debris with a stiff brush or scraper.
- For metal parts, especially on shovels, trowels, and hoes, wipe them clean. If there’s rust, tackle it now with steel wool or a wire brush.
- Dry all tools thoroughly, especially metal components, to prevent future rust.
- Consider lightly oiling metal parts (like blades or shovels) with a few drops of mineral oil or tung oil to protect them during storage. Wooden handles might benefit from a wipe down with linseed oil to prevent drying and cracking.
Clean tools are not only pleasant to use but also store better and last longer.
Step 3: Categorize Your Arsenal
With your clean and curated collection, group similar tools together. This makes designing your storage system much easier. Common categories include:
- Long-Handled Tools: Shovels, rakes, hoes, brooms, cultivators.
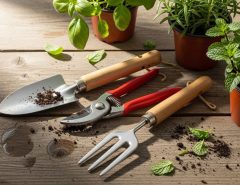
- Hand Tools: Trowels, weeders, cultivators, hand pruners, snips.
- Cutting Tools: Loppers, hedge trimmers, saws.
- Watering Equipment: Hoses, watering cans, sprinklers, nozzles.
- Power Tools: String trimmers, leaf blowers, hedge trimmers (and their batteries/chargers).
- Small Items & Supplies: Gloves, ties, labels, markers, small stakes, seed packets.
- Chemicals, Fertilizers, & Soil Amendments: Bags of soil, fertilizer, pesticides, herbicides (handle with care and store safely).
- Bulk Items: Wheelbarrow, garden cart, large planters.
Step 4: Design Your Garden Tool Storage Zone
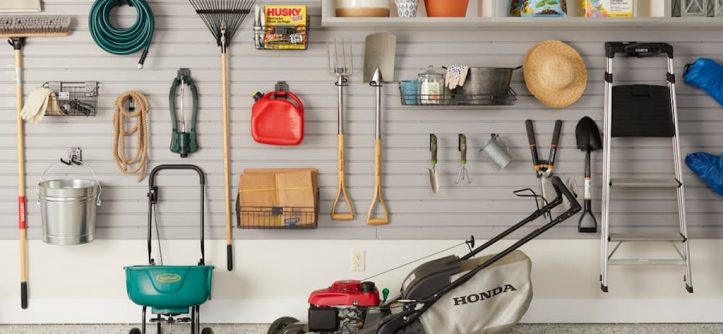
Now for the fun part: planning where everything will go. Think vertically! The walls of your garage are your best friends for garden tool storage, especially for long-handled items.
- Assess Your Space: Look at the available wall space. Is there an empty section? Can you utilize the space above windows or doors? Consider the height – you’ll want long tools to hang without hitting the floor or ceiling fan.
- Think Accessibility: Store frequently used tools in easily accessible locations. Seasonal tools can go higher or in less prime spots.
- Safety First Layout: Position sharp or heavy tools where they are less likely to be accidentally bumped or grabbed by children or pets. Store chemicals and hazardous materials securely and preferably high up.
Step 5: Implementing Storage Solutions (The How-To)
This is where the magic happens. There are numerous storage solutions available, ranging from simple DIY tricks to robust commercial systems. Mix and match based on your tool types, space, budget, and preference.
Related: A Guide to Repairing Your Garage Door Cable
Utilizing Wall Space – The Vertical Advantage

Wall storage is the cornerstone of efficient garden tool organization in a garage. It gets things off the floor, making cleaning easier and reducing trip hazards.
- Heavy-Duty Hooks and Hangers: This is the most straightforward and often most effective method for long-handled tools.
- Types: Look for sturdy, purpose-built hooks designed for garage or garden tools. Options include:
- J-Hooks: Simple curved hooks.
- U-Hooks/Double Hooks: Provide more stability for heavier items or can hold multiple tools.
- Specialty Tool Hangers: Racks specifically designed to hold multiple long tools upright or angled.
- Installation: Mount hooks directly into wall studs for maximum strength. Use heavy-duty anchors if mounting into drywall (ensure they can support the weight of multiple tools). Space hooks appropriately so tools aren’t crammed together.
- Placement: Hang shovels, rakes, hoes, brooms, and cultivators vertically or at a slight angle along a wall. This keeps them tidy and easy to grab.
- Types: Look for sturdy, purpose-built hooks designed for garage or garden tools. Options include:
- Pegboard: A classic for smaller tools and supplies.
- How to Use: Mount pegboard sections on the wall. A wide variety of hooks, bins, and shelves designed for pegboard can hold hand trowels, pruners, gloves, ties, small bags of seeds, markers, and other small items.
- Benefits: Extremely versatile and customizable. You can rearrange the layout as your tool collection changes.
- Tips: Use sturdy metal hooks for heavier items. Plastic bins are great for corralling small, loose items.
- Slatwall Panels: A more robust and often more aesthetically pleasing wall storage system.
- How to Use: Install interlocking panels onto your wall. Like pegboard, a wide array of hooks, shelves, baskets, and specialty hangers attach securely to the slats.
- Benefits: Offers a clean look, is very strong, and is highly adaptable. Can hold heavier items than standard pegboard. Excellent for organizing a mix of tool sizes and types.
- Garden Tool Racks/Organizers: Freestanding or wall-mounted racks specifically designed to hold multiple long-handled tools upright.
- Types: Some have slots for handles, others have clips or hooks.
- Benefits: Keeps tools together in a designated area. Can be easier to install than multiple individual hooks.
Related: Learn How To Create A Secret Garden
Floor-Based Storage Solutions
While the goal is to get tools off the floor, some items are best stored low or in dedicated floor units.
- Cabinets: Ideal for storing chemicals, fertilizers, pesticides, or power tools that you want to keep secure, away from dust, or out of sight.
- Safety: Ensure cabinets for chemicals are lockable and stored according to product instructions, ideally elevated to prevent leaks from spreading and out of reach of children and pets.
- Tool Chests or Rolling Carts: Great for storing hand tools, power tool batteries/chargers, and other smaller, valuable items. A rolling cart can be convenient for wheeling tools closer to your workspace.
- Storage Bins and Totes: Useful for corralling items like watering cans, sprinklers, bags of soil amendments, or seasonal items like frost covers. Clear bins allow you to see the contents easily.
- Freestanding Shelving Units: Can hold larger bins, bags of soil, pots, or other bulky garden supplies that don’t easily hang.
Specific Tool Storage Strategies:
- Long-Handled Tools: Primarily use wall hooks or dedicated wall racks. Ensure the hook size matches the handle diameter and the hook’s depth is sufficient to hold the tool securely.
- Hand Tools: Pegboards with specific hooks, magnetic strips (for metal tools), tool belts hung on hooks, drawers in a workbench, or dedicated bins/caddies.
- Small Items (Gloves, Ties, Markers): Use small bins, jars (mounted on a pegboard or shelf), labeled containers, or dedicated drawers.
- Power Tools: Store in their cases on shelves, in cabinets, or on heavy-duty wall mounts designed for power tools. Store batteries according to manufacturer instructions, often at room temperature.
- Watering Equipment: A hose reel (wall-mounted or freestanding) is essential for hose storage. Watering cans can be hung on large hooks or stored on a shelf. Sprinklers and nozzles can go in a labeled bin or on a pegboard.
- Wheelbarrow/Garden Cart: Hang on heavy-duty wall hooks designed for bulky items if possible to free up floor space, or store it upright in a corner if space allows.
DIY vs. Store-Bought Solutions:
- DIY: Can be budget-friendly and customized to your exact needs. Simple solutions like mounting scrap wood with notches for tool handles or repurposing old containers can be effective.
- Store-Bought: Offers convenience, durability, and often specialized designs for tools. Commercial garage organization systems (slatwall, track systems, heavy-duty hooks) are designed for weight and long-term use.
Consider your budget, your DIY skills, and the desired level of durability and finish when making choices. A combination of both is often the most practical approach.
Step 6: Label Everything!
Once tools are in their designated spots, add labels. This might seem like overkill, but it’s incredibly helpful for maintaining the system, especially if multiple people use the garage. Label shelves, bins, and even sections of the wall if you have specific zones (e.g., “Cutting Tools,” “Hand Tools”).
Step 7: Establish a Routine for Maintenance
Organization isn’t a one-time event; it’s an ongoing process.
- Put Tools Away Immediately: The golden rule! Get in the habit of cleaning tools and returning them to their spot as soon as you’re finished using them.
- Regular Tidying: Spend 5-10 minutes each week or after significant gardening tasks quickly putting anything misplaced back in its spot.
- Seasonal Review: A couple of times a year (e.g., spring and fall), do a mini-assessment. Declutter again, clean tools, and adjust your storage system if needed based on how you’ve been using your tools.
Related: Get Creative: Learn How to Hang Plants from Your Ceiling Without Making Holes
Safety First: A Non-Negotiable
Reiterating the safety aspects is vital:
- Sharp Edges: Store sharp tools (pruners, loppers, saws) with blades closed and preferably in a location where their sharp edges are not at head height or easily brushed against. Consider blade guards if available.
- Chemicals: Store fertilizers, pesticides, and herbicides in their original containers with labels intact. Keep them in a locked cabinet or on a high shelf, away from food, pet supplies, and sources of heat or ignition. Follow all product-specific storage instructions.
- Heavy Items: Ensure wall mounts and hooks are securely fastened to studs or use appropriate heavy-duty anchors to prevent heavy tools from falling.
- Visibility: Ensure walkways are clear and tools don’t obstruct paths or access points.
Conclusion: Enjoy Your Organized Oasis
Transforming your garage from a garden tool graveyard into an organized, efficient space takes effort, but the rewards are well worth it. You’ll save time, protect your valuable tools, enhance safety, and reclaim usable space.
By following these steps – gathering and decluttering, cleaning, categorizing, designing a layout, implementing smart storage solutions (especially utilizing vertical space), labeling, and maintaining the system – you can create a garden tool organization system that works for you and stands the test of time. Say goodbye to the clutter and hello to a more productive and enjoyable gardening season, knowing exactly where to find the right tool for the job, every single time.
What are your favorite garden tool organization tips or tricks? Share them in the comments below!


Leave a Reply