


Your front door welcomes everyone who visits your home. Over time, it warps, fades, or simply looks tired. However, the frame often stays strong. Replacing only the door slab saves thousands compared to a full pre-hung unit. According to the U.S. Department of Energy, exterior doors account for up to 11% of a home’s heat loss when poorly sealed. A fresh door boosts curb appeal, improves energy efficiency, and enhances security without major construction.
This complete 2025 guide walks you through every step. You will discover how to measure accurately, choose the right replacement door, remove the old one safely, install the new slab, and weatherproof everything perfectly. Follow along, and you can finish the project in one weekend.
Why Replace Just the Door Slab?
Many homeowners assume they must buy a pre-hung door with a new jamb. In reality, 8 out of 10 existing frames remain structurally sound, according to remodeling data from the National Association of Home Builders. Keeping the original frame avoids siding damage, brickmold removal, and interior trim repairs.
Moreover, slab-only replacements cost far less and create less waste. You also maintain the exact opening size, which matters for historic homes or custom sidelights. Finally, modern slab doors come pre-bored for standard hardware, making the swap straightforward.
When Should You Keep the Existing Frame?
Not every frame deserves saving. Inspect carefully before you decide.
Consider these signs of a healthy frame:
- No rot, cracks, or soft spots when you poke with a screwdriver
- Square and plumb when measured diagonally (difference less than 1/4 inch)
- Solid anchoring to the rough opening
- Intact brickmold and exterior trim
Replace the entire unit if you notice severe rot, insect damage, or twisting beyond 1/2 inch. Otherwise, proceed confidently with a slab replacement.
Tools and Materials You Need
Gather everything beforehand. Preparation prevents frustrating trips to the store.
Essential tools:
- Cordless drill/driver and bits
- Phillips and flat-head screwdrivers
- Pry bar and trim puller
- Hammer and nail set
- 4-foot level and tape measure
- Utility knife and wood chisels
- Circular saw (for minor trimming)
- Safety glasses, gloves, and dust mask
Materials list:
- New exterior door slab (fiberglass, steel, or wood)
- Exterior-grade shims
- 3-inch exterior screws
- High-quality exterior caulk and backer rod
- Low-expansion foam insulation
- Weatherstripping and door sweep
- New hinges (if not reusing old ones)
- Threshold sealant (if needed)
Step 1: Measure Your Existing Door Accurately
Accuracy determines success. Measure three times to avoid returns.
First, measure width at the top, middle, and bottom of the slab (not including brickmold). Record the smallest number. Next, measure height from the top of the slab to the finished floor on both sides and the center. Again, use the smallest measurement.
Then, check thickness—most residential doors measure 1-3/4 inches. Finally, confirm hinge locations from the top of the door to the center of each hinge (usually 7 inches and 11 inches from the top on a 3-hinge door). Write everything down.
Step 2: Choose the Right Replacement Door
Today’s market offers three main materials.
Fiberglass doors dominate sales because they resist denting, warping, and fading. Steel doors provide maximum security and affordability. Wood doors deliver classic beauty but require more maintenance.
Look for these features:
- Pre-bored lockset holes at 2-3/8 or 2-3/4 inch backset
- Matching hinge mortises or blank slate for routing
- Energy-efficient core with U-factor below 0.30
- Raised or flat panels that match your home’s style
Order the door slightly oversized (1/8 inch narrower and 1/2 inch shorter) for final trimming

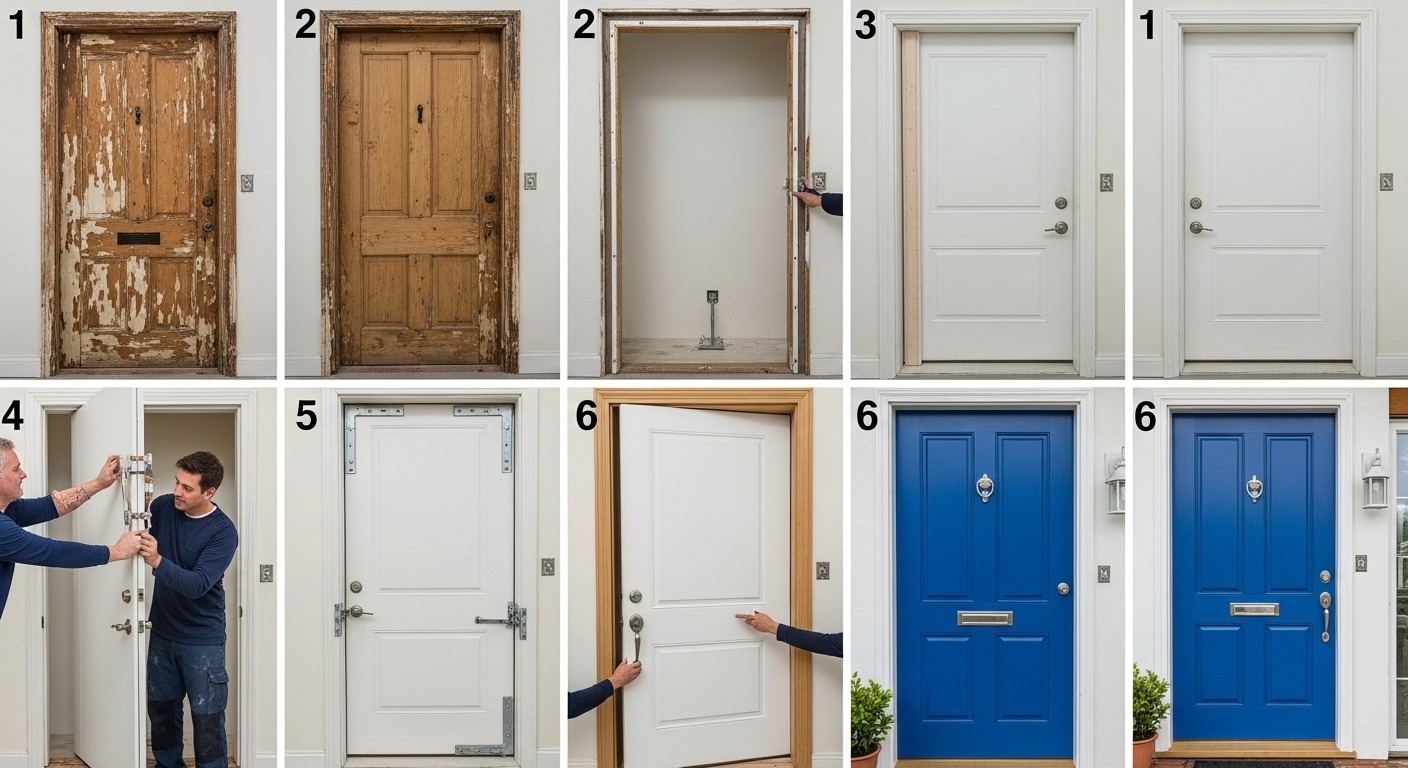
Step 3: Remove the Old Door Safely
Start inside the home for better control.
Close the door and remove hinge pins with a hammer and flat screwdriver. Tap upward from below. Support the door weight as the last pin comes free. Two people make this step easier.
Next, carry the old slab away. Then, remove interior trim carefully with a trim puller if you plan to reuse it. Finally, unscrew and remove old hinges from the jamb.
Step 4: Clean and Prepare the Frame
Now expose a clean surface.
Scrape away old caulk, paint drips, and debris with a 5-in-1 painter’s tool. Check the hinge jamb for plumb using a 4-foot level. Shim or plane high spots until the gap remains consistent.
Moreover, inspect the latch jamb the same way. Sand rough areas lightly. Vacuum dust thoroughly before proceeding.
Step 5: Dry-Fit the New Door Slab
Place the new door in the opening without hinges.
Center it left to right with equal reveals (usually 1/8 inch on each side). Check the top gap—aim for 1/8 inch to 3/16 inch for seasonal expansion. Mark hinge locations precisely using the old door or measurements.
Additionally, verify the lockset height (typically 36–38 inches from the floor). Trace mortises lightly with a utility knife.
Step 6: Mortise Hinges and Bore Lockset (If Needed)
Most new slabs come pre-hung ready, but some require work.
Lay the door on sawhorses. Score hinge outlines deeply with a utility knife to prevent splintering. Chisel out the mortises to the exact depth of the hinge leaf (usually 1/8 inch). Test-fit each hinge—it should sit flush.
For lockset boring, use a professional door lock installation kit. Drill the 2-1/8 inch hole first, then the 1-inch latch hole. Follow template instructions exactly.
Step 7: Hang the New Door
Attach hinges to the door first using only one screw per leaf initially.
Lift the door into place (two people recommended). Align hinge leaves with jamb marks. Insert shims behind each hinge location to maintain perfect reveal. Drive one screw per hinge into the jamb.
Close the door slowly. Check gaps all around. Adjust shims as needed until the door closes smoothly without rubbing. Add remaining screws. Tighten everything firmly.
Step 8: Install Hardware and Weatherstripping
Transfer your old knob, deadbolt, and strike plates, or install new ones.
Adjust the strike plate location if necessary by chiseling slightly deeper or adding a filler plate. Test the latch and deadbolt multiple times—they must engage smoothly.
Next(counts as transition), apply new compression weatherstripping to the stop molding or use kerf-style strips in the door edge. Install a new door sweep or adjustable threshold to seal the bottom completely.
Step 9: Insulate and Caulk for Energy Efficiency
Proper sealing makes the biggest difference in comfort.
First, run a thin bead of low-expansion foam between the jamb and rough opening from inside. Do not overfill—foam expands dramatically. After it cures (about 1 hour), trim excess with a utility knife.
Then, caulk the exterior joint between brickmold and siding using premium 50-year exterior caulk. Tool it smooth with a gloved finger for a clean look.
Step 10: Final Adjustments and Painting/Staining
Open and close the door 20 times to settle hinges.
Plane or sand any high spots that bind (always remove the door for planing). Adjust the threshold height if sweeping drags or gaps appear. Touch up hinge screws with paint to prevent rust.
If you chose a primed or unfinished door, apply exterior primer and two coats of high-quality exterior paint or stain within one week of installation.
Common Mistakes to Avoid
Homeowners often rush these steps.
Never hang the door without shimming behind hinges—gaps will appear later. Avoid reusing old weatherstripping; it rarely seals properly. Do not overtighten hinge screws—strip-out ruins the jamb.
Moreover, skipping the dry-fit leads to crooked installation. Always check diagonal measurements after hanging to confirm squareness.
Related Topics: From Dough to Dinner: Mastering Pasta with KitchenAid Tools
How Long Does the Project Take?
A competent DIYer finishes in 6–10 hours spread over one weekend. First-timers should allow two full days. Professional installation typically takes 3–5 hours.
Conclusion
You now possess every detail needed to replace your front door without touching the frame. Measure carefully, choose a quality slab, and follow each step methodically. The result? A beautiful, energy-efficient entry that boosts curb appeal and home value instantly.
Grab your tools, order that new door, and transform your home this weekend. Your future self—and every guest who walks through—will thank you.
FAQs
Can I install a fiberglass door in place of a wood door without changing the frame?
Yes, absolutely. Fiberglass slabs fit the same openings as wood or steel doors as long as dimensions match.
Do I need to remove siding to replace just the slab?
No. Slab-only replacement never requires disturbing siding or brickmold when the frame stays intact.
What if my old door used 4 hinges instead of 3?
Order a door blank and add the extra hinge yourself, or have a local millwork shop mortise it professionally.
Will the new door match my existing sidelights perfectly?
Most manufacturers offer matching slabs for popular sidelight configurations. Provide your exact measurements when ordering.
Is it possible to reverse the swing direction when replacing only the slab?
Generally no. Reversing swing requires moving the entire frame or extensive jamb modifications.
References
- U.S. Department of Energy – Energy Efficient Doors: https://www.energy.gov/energysaver/energy-efficient-windows-doors-and-skylights
- National Association of Home Builders – Remodeling Market Data
- Fine Homebuilding – “Replacing an Exterior Door Slab” guide


Leave a Reply
Cancel reply